To change WiFi on Ring Doorbell, open Ring app, choose your device, go to Device Health, press Change WiFi Network, and follow instructions. Put the doorbell in setup mode, connect to the new network, and enter the WiFi password. Wait for the reconnection to complete successfully, step by step.
Is your Ring doorbell showing offline after you switched to a new router or changed your internet provider? Don’t worry, learning how to change WiFi on Ring Doorbell is a straightforward process that takes just a few minutes. Whether you’ve upgraded your router, changed your WiFi password, or moved to a new home, this guide walks you through every step clearly.
Why You May Need to Change WiFi on Ring Doorbell?
There are several common reasons your Ring device’s offline status appears, and you need to update the network:
- You switched to a new internet service provider
- You replaced or upgraded your router
- You changed your WiFi password
- You moved the doorbell to a different location
- Your network name (SSID) was updated
In all these cases, the fix is the same: reconnecting your device through the Ring app.
What You Need Before You Start?
Before you begin the process to change Ring cam WiFi, keep the following ready:
- Your smartphone with the Ring app installed (iOS or Android)
- Your new WiFi network name and password
- Access to your Ring account (email and password)
- Your Ring Doorbell charged or wired and powered on
Change WiFi On Ring Doorbell - Step-by-Step
Step 1: Open the Ring App
Launch the Ring app on your smartphone and log in to Ring account. Make sure your phone is connected to the same WiFi network you want your Ring doorbell to use.
Step 2: Go to Device Settings
On the app’s home screen, tap the three lines (menu icon) in the top left corner. Select Devices, then tap on the specific Ring doorbell you want to update.
Step 3: Tap on Device Health
Inside your device dashboard, scroll down and tap Device Health. This section shows you the current network status of your doorbell and is exactly where you manage your network connection.
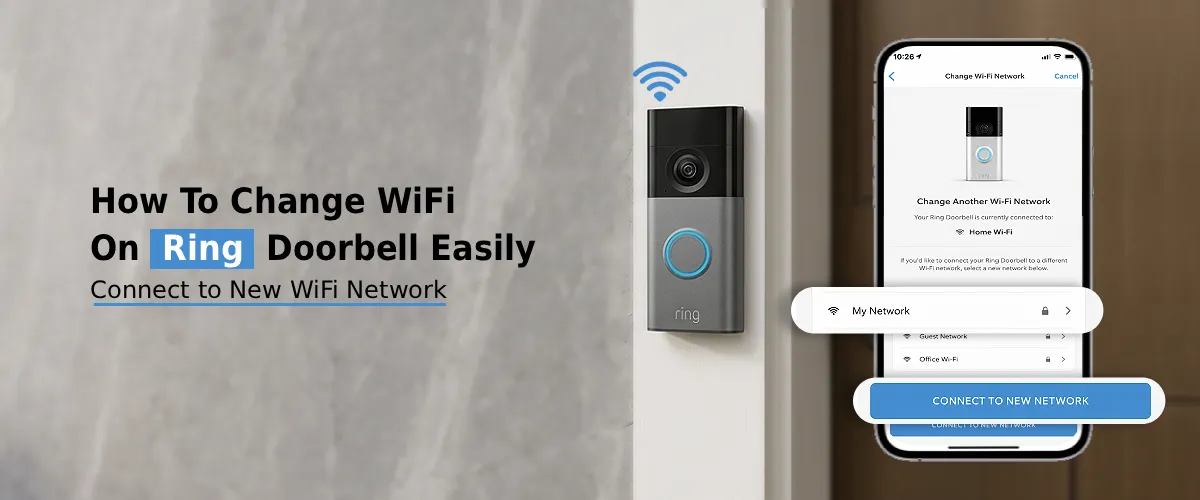
Step 4: Select “Change WiFi Network”
Under the Network section in Device Health, tap Change WiFi Network. This is the key step in the Ring doorbell change wifi process. The app will prompt you to put your device into setup mode.
Step 5: Put Your Ring Doorbell Into Setup Mode
Press the orange button on the back of your Ring Doorbell. Hold it for a few seconds until the front light begins spinning; this means the doorbell is now in setup mode and ready to connect to a new network. For video doorbells without a removable faceplate, the Ring Doorbell setup button may be on the side or inside the charging port area.
Step 6: Follow the In-App Instructions
The Ring app will now walk you through connecting your doorbell to the new WiFi network. It will ask you to:
- Connect your phone to the Ring’s temporary hotspot (named something like “Ring-XXXXXX”)
- Return to the app once connected
- Select your home WiFi network from the list
- Enter your new WiFi password
This is essentially the standard Ring setup process, repeated for the new network.
Step 7: Wait for Confirmation
Once you enter your WiFi credentials, the app will attempt to connect your doorbell to the new network. This usually takes 30 to 60 seconds. When successful, you’ll see a confirmation screen and your device status will update from offline to online in the Device Health section.
How to Change WiFi On Ring App- Tips For a Smooth Process
Knowing how to change WiFi on Ring app is easy once you’ve done it, but here are a few tips to avoid common hiccups:
- Stay close to your router during setup for a stronger signal
- Double-check your WiFi password before entering; typos are the most common cause of failed connections
- Use 2.4GHz over 5GHz for better range and compatibility (more on this below)
- Restart your router before starting if it was recently changed or reset
- Make sure your Ring app is updated to the latest version
How to Change WiFi On Ring Camera (Non-Doorbell Devices)
The process for how to change WiFi on Ring camera, including Spotlight Cam, Stick Up Cam, and Floodlight Cam, is nearly identical:
- Open the Ring app
- Tap Devices and select your camera
- Go to Device Health
- Tap Change WiFi Network
- Press the setup button on the camera (location varies by model)
- Follow the in-app steps to connect to the new network
For battery-powered cameras, ensure the battery is sufficiently charged before starting. A ring camera change wifi attempt with a low battery may fail midway, leaving the device in an unresponsive state.
What to do If Your Ring Device Shows Offline After Changing WiFi
If your Ring device offline status persists after the above steps, try the following:
- Restart the Ring Doorbell by pressing and holding the setup button for 20 seconds
- Restart your router and wait for it to fully reconnect before trying again
- Check signal strength in Device Health; if RSSI is above -60, the signal may be too weak
- Forget the network on your phone and reconnect manually before retrying
- If nothing works, you may need to reset the camera to factory settings (see below)
When to Reset Your Ring Camera?
A full factory reset should be a last resort. To reset Ring cam, press and hold the orange setup button on the back for 20 to 30 seconds until the light flashes. This wipes all settings, and you’ll need to re-add the device in the Ring app from scratch. Use this only when repeated WiFi change attempts have failed completely.
FAQs:
Yes, absolutely. Whenever you get a new router, simply open the Ring app, go to Device Health for your doorbell, and tap “Change WiFi Network.” Follow the setup steps to connect it to the new router’s network. You do not need to purchase a new device or reinstall anything physically.
It depends on the model. Most older and entry-level Ring Doorbells only support 2.4GHz WiFi. Newer models like the Ring Video Doorbell Pro and Pro 2 support both 2.4GHz and 5GHz bands. Check Ring’s official product page for your specific model. If you’re experiencing connectivity issues, switching to 2.4GHz is generally recommended for better range and wall penetration.
Yes. The entire process to change WiFi on a Ring Doorbell is done through the Ring app. You do not need to physically remove or uninstall the doorbell. Simply press the setup button (accessible without removing the device on most models) and follow the in-app prompts.
Your Ring device connects to your home WiFi, not a Ring-specific password. If you’ve forgotten your home WiFi password, log in to your router’s admin panel (usually at 192.168.1.1 or 192.168.0.1) to find or reset it. Once you have the correct password, proceed with the standard WiFi change steps in the Ring app.
No, a factory reset is not required. The “Change WiFi Network” option in the Ring app’s Device Health section is specifically designed to update the network without resetting the device. A full reset (which erases all settings) is only necessary if the device is completely unresponsive or you’re troubleshooting a persistent connection failure.
Final Thoughts
Changing the WiFi on your Ring Doorbell is a task any homeowner can handle without professional help. Whether you’re doing change wifi on Ring doorbell after switching providers, updating credentials, or doing a fresh doorbell setup in a new home, the Ring app makes the process simple. And if things go sideways, the troubleshooting steps and option to reset the Ring cam ensure you’re never stuck for long. Keep your app updated, your WiFi password handy, and you’ll have your doorbell back online in minutes.